Day: Twenty-seven
Date: June 7th, 2014
Mission: Cob-oven and solar dehydrator
Okey dokey, today was one of the soon to be many cooking in the sun workshops. Cooking the sun is a grant Maarja and James obtained from the EU to make different cooking appliances that utilize solar energy or manual power to run. Once these appliances are made, we shall be creating and publishing a cookbook filled with recipes you can make using these devices and also a how-to manual to build these appliances. Today we built a cob oven and a solar dehydrator. We have plans to also build a bike blender and a rocket stove to heat water/fry with.
As usual, it might be easier to just see the pictures and read the captions to fully understand how to build both. But to give credit where it is due, our idea for the solar dehydrator was borrowed from this website
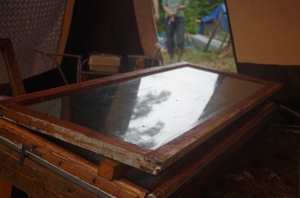
http://www.geopathfinder.com/9473.html. But we adjusted the plans by using an old window instead of plastic glazing, and instead of building a food tray box, we just used an old window frame. We painted the aluminum metal sheet black with a mixture of graphite and linseed oil. Unfortunately we could not find a shop that sold the stainless steel mesh and so we have ordered it online and it should, fingers crossed, be making an appearance sometime this week!
Additional things we did today: Ate bloody fantastic food. A couple of the volunteers were really into foraging and raw food and so we had some very interesting meals. A salad where all the greens came from our wild backyard, and fried nettle burger things, and a scrumptious date/banana raw and gooey dessert. Enough said. YUM.

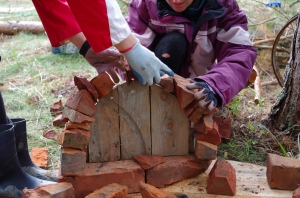
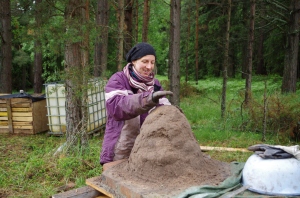


Completed cob oven

Steps 1 and 2: We found two reclaimed windows of the same size for the window section and food screen section. We removed the glass from the food screen section window.
We scraped of the paint from both and applied linseed to protect the wood and add some colour.
The window section has a piece of metal, that we painted black, screwed to it (Step 3). With the glass and black metal, the window section will be the heating element for the food underneath.
We attached stainless steel mesh to the food section, on which the food will be placed

Step 3: Paint the reclaimed metal black and screw to window section

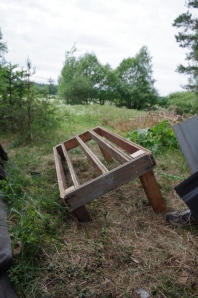
Step 4: Prepare base that food screen section and window section will rest on

Completed base

Step 5: Cut slatted metal, which will be secured to base

Cutting slatted metal
Step 6: Add legs to base to achieve ~15 degree angle (though ours ended up being slightly larger…)

Step 7: Secure slatted metal to base
Attach all 3 sections (window, food screen, and base) together with brackets and hinges to complete dehydrator

Completed dehydrator


